


Unlock more with the Adobe Podcast Premium plan 
- Enhance Speech fixes audio problems after the fact, no perfect mic needed
- Video support for MP4, MOV, and more
- Bulk upload files for enhancement
- Adjust speech, music, and ambience for a more natural sound
- Enhance up to 4 hours a day, files up to 1 GB
- No download limits on Studio projects
- Download original recordings, speaker-separated
- Customize audiograms and captions with themes
- Upload custom backgrounds for audiograms
- All Premium features for design
Enhance Speech


Studio


Design with Adobe Express Premium

 Start free trial
Importing your multitrack Zoom recordings into Adobe Podcast
From virtual calls to polished podcasts—how to import and edit multitrack Zoom recordings.
Last updated: February 13, 2026
Author: Megan Schmidt, Writer & podcast producer
Some creators opt for dedicated podcasting platforms, while others prefer the simplicity of tools they’re already familiar with—like Zoom. If that sounds like you, you are definitely not alone. In fact, it’s estimated that somewhere around 37% of people use Zoom to record their podcasts.
And why not? It’s a software that most people have grown very accustomed to: guests are familiar with the interface, the troubleshooting steps are generally simple, and there are multiple tiers depending on what you can afford (including a free plan).
Plus, a few years ago, Zoom started letting you change your recording settings so you can record a separate audio file for each participant. This kind of multitrack recording capability makes editing things like conversations or interviews actually possible.
But before we jump into the best way to edit your multitrack recording in Adobe Podcast, let’s make sure you know how to get those individual audio files from Zoom.
How to set up Zoom to record separate audio for each participant
Before you can import multitrack audio into Adobe Podcast, you need to make sure Zoom is actually recording separate audio files for each person on the call. Luckily, setting this up only takes a minute—and once you’ve done it, Zoom will remember your preferences for next time.
Here’s how to enable multitrack recording in Zoom:
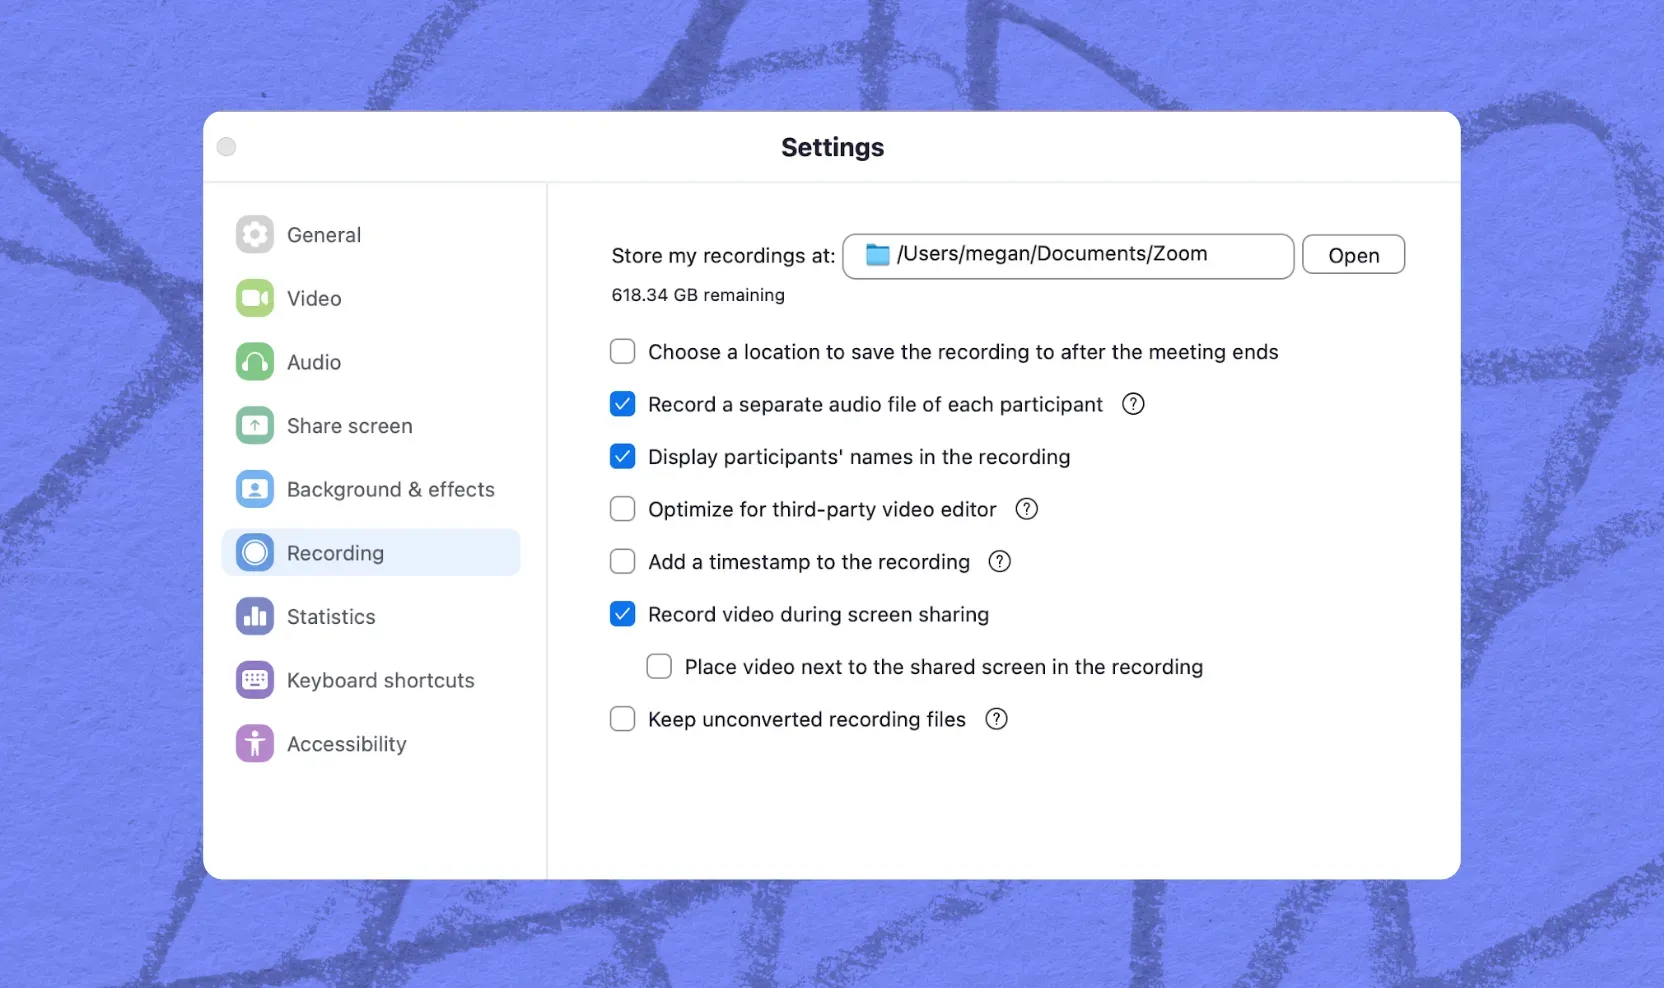
1. Open Zoom and go to Settings
You can do this by opening the Zoom desktop app, clicking your profile picture in the top right, and selecting Settings.
2. Navigate to the “Recording” tab
In the left-hand menu, click on Recording to access your local recording settings.
3. Check the box for “Record a separate audio file for each participant”
You’ll find this option under the "Local Recording" section. Once it’s checked, Zoom will automatically create individual audio files for everyone who speaks during the call.
4. Make sure local recording is enabled.
This feature only works when you're recording to your computer (not to the cloud), so double-check that you're using local recording.
Once you’ve finished your recording, Zoom will create a folder with a separate .m4a file for each participant, labeled by name (or “audio_recording” if Zoom doesn’t have that info). You’ll use these individual files when uploading to Adobe Podcast.
Pro tip: Do a quick test call with a friend or co-host before your actual interview. This way, you can make sure the settings are working correctly and get comfortable with the multitrack file layout.
Finding and organizing your files after the call
Once your Zoom recording wraps up, Zoom will automatically convert and save your files to a folder on your computer. If you’ve enabled the setting to record each participant separately, you’ll find individual audio files ready to go.
Where Zoom saves your files
By default, Zoom saves recordings to a folder in your Documents under:
- Documents > Zoom > [Meeting Name] > [Date + Time of Recording]
Inside that folder, you’ll see a mix of files, including:
- A combined video (if video recording was enabled)
- A mixed audio file (audio_only.m4a)
- And most importantly: separate audio files for each participant, labeled something like:
- audio_recording_0.m4a
- audio_recording_1.m4a
- etc.
Rename your files for clarity
Zoom’s default names aren’t super descriptive, so it’s a good idea to rename the multitrack files before importing them into Adobe Podcast. Try something like:
- Host_Jordan.m4a
- Guest_Chris.m4a
This makes it way easier to stay organized—especially if you’re juggling multiple recordings or collaborators.
Create a folder structure
To keep your editing workflow clean, consider setting up a consistent folder structure for each episode. For example:
/Episode_10/
- Zoom_Tracks/
- Host_Jordan.m4a
- Guest_Chris.m4a
- Final_Edit/
- Show_Notes/
Taking a few extra minutes to organize your files upfront can save you a ton of time (and stress) once you’re in the editing phase.
Uploading your Zoom tracks into Adobe Podcast
Once you’ve got your individual Zoom audio files labeled and organized, it’s time to bring them into Adobe Podcast for editing. Adobe makes the upload process really simple, and because you’re working with multitrack audio, it opens up a lot of flexibility for polishing up your episode.
Step-by-step: Importing your files
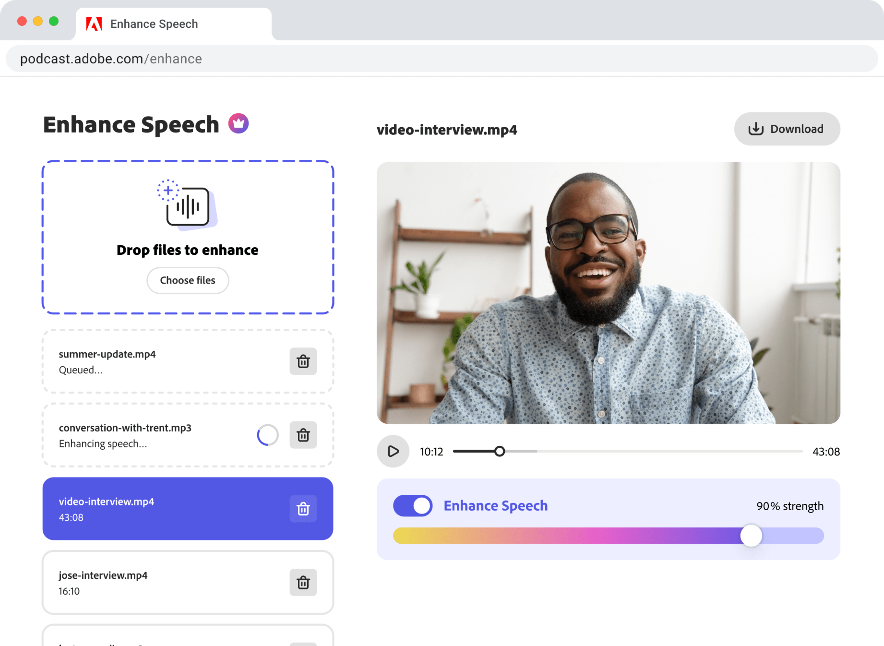
1. Head to Adobe Podcast at podcast.adobe.com.
- Log in with your Adobe ID — or create one if you haven’t already (there’s a free version!).
2. Navigate to Studio, https://podcast.adobe.com/studio, and click “New Project”
- You’ll be taken to a blank project where you can start uploading files.
3. Drag and drop your multitrack audio files
- Click on the “Add” icon to the left, and select “Upload a group recording”
- Just grab your renamed Zoom files (like Host_Jordan.m4a, Guest_Chris.m4a, etc.) and drop them directly into the project.
- Click “Add to project”
4. Let it process the audio
- Adobe will take a moment to sync everything up and generate transcriptions. From there, you’ll be able to edit your project as usual.
File format tips
Zoom gives you .m4a files, which work perfectly in Adobe Podcast. But if you’re using other tools or converting files for any reason, stick with common formats like .wav or .mp3—they’re all supported.
Tips for a smoother workflow
Once you get the hang of importing and editing multitrack audio, your podcast workflow will start to feel a lot more streamlined. Here are a few easy habits that’ll make the whole process smoother from start to finish:
Double-check your Zoom settings before every recording
It takes 10 seconds, and it saves you from that heartbreaking moment when you realize you only recorded one messy mixed-down file. Trust us—it’s worth the glance.
Keep a consistent folder structure
Create a go-to template for your podcast episodes. Something like:
/[Episode Name]/
- /Raw_Audio/
- /Edited/
- /Music_Assets/
- /Show_Notes/
Not only does this keep things organized, but future-you will thank you when you’re looking for that one random file six months from now.
Do a quick test run if you’re trying something new
Whether you’re using a new mic, a new guest setup, or a new editing tool, give it a dry run. This can catch problems early — before you lose any valuable recordings.
Label your tracks clearly before importing
Renaming files like Guest_Julia.m4a and Host_Alex.m4a saves time once you're editing. Bonus points if you include the date or episode number.
Final thoughts
Zoom might not be the trendiest podcasting tool out there, but it’s still a totally valid—and surprisingly powerful—option, especially if you're recording remotely. By enabling multitrack recording and bringing your files into Adobe Podcast, you unlock a way cleaner and more flexible editing experience.
Whether you’re a solo creator or managing a full interview-style show, this workflow helps you turn raw conversations into polished, listenable episodes—without a huge learning curve or a fancy setup.
Take your Zoom recordings to the next level—start editing in Adobe Podcast today.
FAQ
Add > upload group recording > drag and drop or upload > Add to project.
About the author: Writer, comedian, podcast producer: Megan loves stories that stick, told sometimes with words, sometimes with waveforms, always with heart.